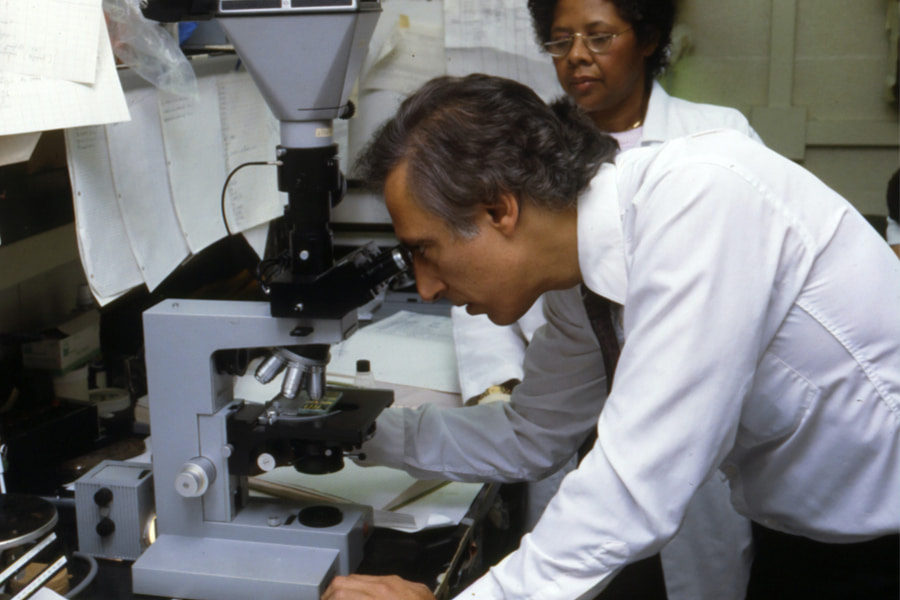
Microscopes come in a variety of shapes and sizes, as well as different powers, and are very useful. Broadly, the purpose of a microscope is to magnify objects. You can even a basic microscope capable of magnifying at least four times its original size. Nonetheless, this article will provide a fundamental overview of the necessary raw materials and manufacturing methods for a professional microscope. Trust us, at the end of the article, you will get to know how to make microscopes.
About Microscopes
As you may know for sure, a microscope is a device that allows you to magnify tiny things. An optical microscope, which utilizes lenses to create pictures from visible light, is the most common type of microscope. Electron microscopes use electron beams to create pictures. Acoustic microscopes use high-frequency sound waves to create pictures. The ability of electrons to “tunnel” through the surface of objects at extremely tiny distances is the basis to create pictures in tunneling microscopes.
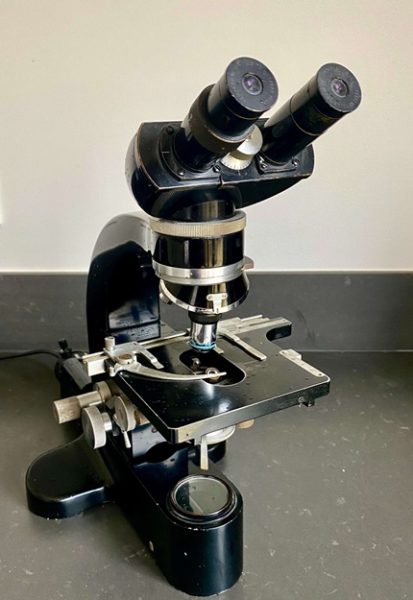
The simplest of all is an optical microscope with a single lens. Magnifying glasses and jeweler’s loupes are examples of simple microscopes. A compound microscope is a two-lens optical microscope. The objective, which holds the lens near the specimen, and the eyepiece, which holds the lens near the spectator, are the two primary pieces of a compound microscope. A light source (either a mirror to collect external light or a light bulb to supply inside light), a focusing mechanism, and a stage are also in a contemporary compound microscope (a surface on which you can hold the object that you need to examine.)
Basically, what we told you is mainly the fundamental information that we need to tell you as an approach to discussing microscopes. Now, let us move ahead in the article and get to know more about how to make microscopes. This article primarily focuses on building optical microscopes.
OMAX 40X-2000X LED Binocular Compound Lab Microscope w/ Double Layer Mechanical Stage + Blank Slides, Cover Slips, & Lens Cleaning Paper, M82ES-SC100-LP100
This compound biological microscope has eight magnification levels, ranging from 40X to 2000X. The microscope’s objectives are 5X, 10X, 40X, and 100X. Both sides have coaxial coarse and fine focus knobs. This ergonomic design allows you to simply change the focus to reach your preferred outcome. Also, this features transmitted illumination in the form of an LED light that may be modified in intensity based on the scenario. It also has a far longer lifespan than a standard halogen bulb.
The parts of an optical microscope
Before discussing how to make microscopes, it would be better if we first get to know the parts of an optical microscope. Then, it would be easier to understand the content.
- An optical system
- Hardware components
- Mirror or light bulb
Now, let us get to know each of these in detail.
1. An optical system
The most important component of an optical microscope is undoubtedly the optical system. It is through the optical system that the magnification process of a microscope takes place broadly. In the optical system, we can discuss 3 parts; namely the eyepiece, the lens system, and the objective.
Eyepiece
The eyepiece, also known as the ocular lens, is the component of a microscope that magnifies the picture by the objective so that we can view it by the human eye. Eyepieces function in tandem with microscope objectives to enlarge the intermediate picture even further, allowing specimen details to give us a good sight. Eyepieces are often referred to as oculars or ocular lenses too. We need to combine objectives with eyepieces that are appropriate for the correction and objective type to get the best results in microscopy.
Externally, we can identify the parts of an eyepiece of an optical microscope as the rubber eyecup, diopter adjustment, and eye tube mounting flange. Internally, the parts that the eyepiece consists of are the eye lens, lens doublet, lens triplet, aperture, eye tube insert housing, and field lens doublet.
Negative eyepieces (or Huygenian eyepieces) with an internal diaphragm and positive eyepieces (or Ramsden eyepieces) with a diaphragm below the lenses are the two basic varieties of eyepieces according to lens and diaphragm configuration. Both the eye and field lenses are plano-convex in their most basic form, with convex sides towards the specimen. A fixed circular hole or internal diaphragm is located about halfway between these lenses. The diameter of the diaphragm determines the circular field of view seen through the microscope.
Lens system
Modern compound microscopes are in a way to magnify a two-dimensional picture allowing for a full analysis of minute structural detail in both two and three dimensions. Thus, having a proper lens system helps us with the microscope big time in fulfilling this objective.
Most microscopes include a translation mechanism built into the stage that allows the microscopist to precisely position, orient, and focus the specimen for better visibility and image capture. To produce the right degree of brightness and contrast in the specimen, diaphragms, mirrors, prisms, beamsplitters, and other optical components are in use to adjust the intensity of illumination and the direction of light paths throughout the microscope.
Modern microscopes include optical components set on a robust, ergonomically built platform that enables quick interchange, precise centering and careful alignment between optically interdependent assemblies. The optical and mechanical components of the microscope create an optical train with a central axis that passes the microscope base and stand, including the mounted specimen on a glass micro slide and coverslip. An illuminator (containing the light source and collector lens), a substage condenser, specimen, objective, eyepiece, and detector make up the optical train of a microscope.
Objective
The eyepiece receives a genuine image of the thing from the objective, which is closest to it. The basic magnification is produced by this component of the microscope. The eyepiece, which is nearest to the eye or sensor, amplifies and displays this real picture, creating a virtual representation of the item.
Because of its multi-element design, objectives are possibly the most sophisticated component in a microscope system, allowing microscopes to generate enlarged, actual pictures. Magnifications ranging from 2X to 200X are available on objectives. The conventional refractive type and the reflecting type are the two basic classifications. There are two sorts of conjugates in each category: finite conjugate and infinite conjugate (infinity corrected). It is necessary to understand the advantages of one category and type over another in order to select a suitable target.
AmScope B120C Siedentopf Binocular Compound Microscope, 40X-2500X Magnification, Brightfield, LED Illumination, Abbe Condenser, Double-Layer Mechanical Stage
This compound microscope is ideal for demonstrations in the classroom, clinical exams, and laboratory work. It’s a great microscope for professors and students, especially those in medical school or studying biology. It features better-LED illumination, a replacement condenser, and Siedentopf head adjustments, among other features, compared to other microscopes in its class. Examine preserved or living cells, bacteria, plants, and soil, or water samples under the microscope. The eyepiece spacing may be simply changed using a precise Siedentopf mechanism to adapt the microscope to your viewing comfort. To compensate for asymmetry, a diopter is offered on the left ocular tube, and the ocular tubes are slanted at 30° to easily accommodate a sitting posture without neck strain. To improve the total optical magnification, a variety of eyepieces can be employed.
2. Hardware components
And now, it is about the hardware components that we are going to discuss. Basically, the parts of a microscope that belong to its body are what we can consider here. Firstly, there is the head of the microscope. Then, we have the frame or the arm of the microscope. Also, we have the base that holds up the microscope. And importantly, we have the stage on which we keep the objective too. Mainly, these are the major parts that we have in a microscope in terms of the hardware components. Apart from these, there are lots of knobs in a microscope too. They are mainly for the purposes of fine-tuning and such adjustments.
100X-2000X Microscopes for Kids Students Adults, with Microscope, Slides Set, Phone Adapter, Powerful Biological Microscopes for School Laboratory Home Education
The body of the microscope is made of high-quality aluminum, weighing just 2.42 pounds and measuring 5.51*3.94*11.42 inches, making it lightweight and sturdy. Images are crisper and sharper with 100X-2000X magnification, dual-LED lighting, perfect focus, and adjustable brightness. And of course, this microscope may be utilized in a variety of settings, including schools, laboratories, homeschooling, and biological research.
3. Mirror or light bulb
In an optical microscope, it can either be a mirror or a light bulb. Let us not take a look at what difference it can make if it is a mirror or light bulb.
Mirror
If a mirror is what the microscope has, it generally consists of tough glass-like Pyrex (a trading name for a glass from silicon dioxide, boron dioxide, and aluminum oxide). The mirror features an aluminum reflecting coating and a silicon dioxide protective coating.
Light bulb
If there is a light bulb, it consists of glass and has a tungsten filament and nickel and iron wires in an argon and nitrogen gas combination. The light bulb’s base is of metal. And the base of the light bulb would be of aluminum.
Swift SW380B 40X-2500X Magnification, Siedentopf Head, Research-Grade Binocular Compound Lab Microscope with Wide-Field 10X and 25X Eyepieces, Mechanical Stage, Ultra-Precise Focusing
The binocular head on this model rotates 360 degrees for shared usage and enables rapid changes for varying interpupillary distances without losing focus. For further stability, we can secure the head in any position. To decrease neck and eye strain, the ocular tubes are angled at an ergonomic are angle. The microscope comes with two sets of interchangeable 10X and 25X glass ocular eyepieces.
The Manufacturing Process
The manufacturing process has also got a lot of steps. We need to look into it deeply to get a good idea of how it flows. It goes according to the following sequence.
- Manufacturing the parts
- Assembling the components
- Finishing
Broadly, these are the steps that we can consider when it comes to the manufacturing of microscopes. Now, let us take a look at each of them and try to get a better understanding.
1. Manufacturing the parts
Firstly, it starts with the manufacturing process of the components. Here is the sequence that we generally need to manufacture it.
- Hardware components
- Optical glass
- Lenses
- Mirror
Of course, you would surely be willing to get into a descriptive explanation. We are moving towards it. Keep reading!
1. Hardware components
Usually, precision metalworking equipment such as lathes and drill presses are in use to make metal hardware components out of steel or steel and zinc alloys. If the microscope’s exterior body shell consists of plastic, it is generally light. Stiff material like acrylonitrile-butadiene-styrene (ABS) is usually in use. Injection molding is in use to create ABS plastic components. The plastic is melted and pushed under pressure into a mold in the shape of the finished product in this procedure. After that, the plastic is allowed to cool and solidify. The product is taken from the mold once it has been opened.
2. Optical glass
The correct raw materials for the type of optical glass sought, as well as a waste glass of the same type, are combined in the proper quantities. Cullet is a waste glass that functions as a flux. Flux is a chemical that induces raw materials to react at a lower temperature than they would otherwise.
Next, in a glass furnace, the mixture is heated until it melts into a liquid. The temperature varies depending on the kind of glass, but it is usually around 2550°F (1400°C). To cause air bubbles to rise to the surface, the temperature is increased to around 2800°F (1550°C). The mixture is then gradually cooled and regularly agitated until it reaches a temperature of around 1800°F (1000°C). The glass is now an extremely thick liquid, which is poured into molds shaped like the lenses to be made.
The glass is warmed to around 1000°F (500°C) after cooling to around 600°F (300°C). Internal tensions arise during the early cooling stage, weakening the glass. This procedure, known as annealing, eliminates them. After that, the glass is allowed to cool to ambient temperature gradually. The glass is taken out of the molds in parts. Blanks is the new term for them.
3. Lenses
The blank is now clamped in a vice and held beneath a diamond-bladed, fast-rotating, cylindrical cutter. The surface of the blank is trimmed by this cutter, known as a curve generator until a close approximation of the required curve is produced. The cut lens is examined and, if required, recut. It may be necessary to make several cuts, which might take anything from a few minutes to more than half an hour.
Several cut blanks are arranged on the surface of a curved block so that their curved surfaces align as if they were all one spherical surface. This enables the grounding of several lenses at the same time. On top of the lenses is a tool, which is a cast-iron grinding surface. The lens block rotates as the tool on top of it moves at random. Between the tool and the lenses, a continuous flow of liquid passes. Water, an abrasive (typically silicon carbide) for grinding, a coolant to avoid overheating, and a surfactant to keep the abrasive from settling out of the slurry make up a slurry.
Afterward, the lenses are transferred to a machine that polishes them. We need to wrap the tape around a curved dish. Then we must pour hot, liquid pitch in and allow it to cool back into a solid. Before it has to be reshaped, a pitch tool can be used roughly 50 times. After polishing, the lenses are examined, and the process is repeated if required. Polishing might take anywhere from 30 minutes to five hours. The lenses have been cleaned and are ready for coating.
Magnesium fluoride is used to cover the lenses. They are then examined once more, tagged with manufacturing date and serial number, and kept until required.
4. Mirror
If the microscope should include, it is constructed similarly to how a lens is constructed. It is cut, ground, and polished flat rather than curved, unlike a lens. After that, we need to apply a reflective coating. Vapor is created by heating aluminum in a vacuum. The mirror’s surface is given a negative electrostatic charge, which attracts the positively charged aluminum ions. This enables the application of a thin, uniform layer of metal. After that, a silicon dioxide protective coating is applied. The mirror, like a lens, is examined, tagged, and kept.
National Optical 40X-1000X Compound Microscope Set with Slides for Students and Kids Biology Cordless Beginner Microscope All Metal
The magnification of this optical microscope ranges from 4X to 1000X with the 4X, 10X, and 40X objectives. And the image clarity and sharpness are at a higher level. Also, this microscope adjusts for chromatic aberrations and edge blur. This has a 45° inclined monocular head and it swivels a full 360°. So, this reduces eye and neck strain. All the same, this has a precision coaxial focusing system as well. All these make it pretty easy for you to use this.
2. Assembling the components
The microscope’s final assembly is entirely by hand. For this, the workers wear gloves, masks, and gowns to protect the microscope’s optics and internal mechanisms from filth. The Microscopelenses are first inserted into the steel tubes that make up the eyepiece and objective bodies. These tubes are available in conventional diameters, allowing them to fit into a standard size microscope.
In most microscopes, the focusing mechanism is a rack and pinion system. The pinion controls the movement of the rack. And it is of a flat piece of metal with teeth on one side (the rack) and a metal wheel with teeth (the pinion). Observing the objective’s movement toward or away from the object is what the rack and pinion control. The rack and pinion have an attachment to the stage (the flat metal plate on which the item rests) in many microscopes, while the objective stays motionless. The knobs that regulate the rack and pinion system are in connection once we install the rack and pinion system.
The microscope’s external body shell is around the internal focusing mechanism. The objective and eyepiece are in place. Of course, we can use many different eyepieces and objectives in any standard microscope because they are in standard sizes.
There is a mirror in the body of the microscope below the opening in the stage if the microscope has one. If it comes with a light bulb, it can either be in the same spot or towards the side of the stage. Both types of light bulbs are there in certain professional microscopes, allowing for both types of viewing. A camera is available to the top of the body if the microscope has one.
80-2000X Optical Microscope, Metal Body, 2 WF Oculars, Dual-illuminators System, US Plug, Full Accessories for Kids Students Beginners
With this microscope, choose a small magnification combination (80X) when you want to see the entire specimen clearly, and a larger magnification combination when you only want to see a component (max 2000X). We can also compare images of the same sample at different magnifications. To see brighter and clearer, use wide-field eyepieces constructed of high-quality all-optical instruments. You can witness the most realistic microbiological world with achromatic aims.
3. Finishing
The accuracy of the lenses is the most important aspect of microscope quality control. We can use a vernier caliper to measure the size of the lens while we cut and polish it. And we can use a spherometer to determine the lens’ curvature. A normal lens should only differ by a thousandth of an inch.
These tests are not precise enough to verify that the lens will concentrate light properly during polishing. The use of optical testing is necessary. An autocollimation test, for example, involves beaming a pinpoint light source through a lens in a dark environment. At the spot where the lens should concentrate the light, a diffraction grating (a surface with hundreds of minuscule parallel grooves per inch) is there. A pattern of light and dark lines forms around the real focal point as a result of the grating. We compare it to the theoretical focus point and, if necessary, we polish the lens.
After that, it is the checking of the microscope’s mechanical components. Also, to generate a crisp image, we must screw the eyepiece and objective firmly into their correct locations. It is necessary to check the rack and pinion focusing mechanism for smooth movement and precise control of the distance between the objective and the stage. Also, it is necessary to check multiple-objective rotating disks to ensure that they revolve smoothly and that each objective stays securely in place while in use.
Swift SW380B 40X-2500X Magnification, Research-Grade Binocular Compound Lab Microscope, Mechanical Stage, with 5.0 mp Camera and Software Windows/Mac Compatible and 100pcs Blank Slides
The binocular head on this model rotates 360 degrees for shared usage and enables rapid changes for varying interpupillary distances without losing focus. For further stability, you can secure the head in any position. And to decrease neck and eye strain, the ocular tubes have an angle of an ergonomic 30-degree angle. Further, the microscope comes with two sets of interchangeable 10X and 25X glass ocular eyepieces.
Conclusion
In this article, we primarily focused on how to make microscopes. We think that we could help you get a good understanding of this.